Monday, November 28, 2011

Homemade Felt Gingerbread Ornaments


So, I was browsing through Michaels a couple of weekends ago and saw Gingerbread Men ornaments. I immediately grabbed a few of them and put them in my basket. After some more browsing through the store, I realized that I can make similar ones for WAAAAAAYYY less. So, being the semimodern person that I am, I decided I wouldn't buy them, I would get the supplies to make a few instead.

After all was said and done, I only spent around  $4 for supplies. Here's what I bought: one bottle of puffy paint "SCRIBBLES SHINY WHITE," one bottle of puffy paint "SCRIBBLES DEEP RED," 2 sheets of brown felt, one spool of silver ribbon for the string to hang from tree (after I made them I thought it would be even cuter with white mini rac-rac?), and one bottle of Tacky Glue. Another supply item I used was a gingerbread cookie cutter for the pattern. You can also Google a pattern online.

Here's what I did:
STEP #1: Trace your pattern onto felt. Make sure that you make an even number-front and back. Then cut them out.


STEP #2: Using the Tacky Glue, run a line of glue around the edge of the wrong side of cutout. At the head, add an extra dollop of glue. Take the silver or ric rac and create a loop. Place the ends of the loop into the dollop of glue.
STEP #3: Take the partner of the first cutout and place wrong side down onto the cutout with glue.  Press down on the edges to make sure that you have a good seal.
STEP #4: Using the white puffy paint, add the "icing" around the edge of the "cookie." HINT: Have a paper towel nearby to wipe excess off the tip of the bottle or to check how much pressure to apply to the bottle to get a nice even line. Also, I put my cookie on another sheet of felt that I rotated as I drew on my icing.
STEP #5: Add the squiggles at the arms and feet and then buttons. HINT: Again, I practiced my pressure on the paper towel to make sure the buttons were going to be the right size.
 STEP #6: Using the red puffy paint, draw on the happy face. Again, practicing on the paper towl first helps to get the right pressure for the smile.

And VOILA!! All done! Super easy and INEXPENSIVE! Make sure to allow 4 hours for the puffy paint to dry.

PS. I am going to try to add a little stuffing to one of them and see if I like them a little "puffy." I'll let you know how it turns out! Flat or puffy, they look like the real thing and I can't wait to put on our tree!

Tuesday, November 1, 2011

Crochet Baby Converse


A friend of mine just found out she's having a baby boy and I wanted to make something fun and different for her baby shower gift. I found these!! I originally purchased a pattern on etsy, but after a few tries with that specific pattern, I gave up. My gauge was off. I wanted something for a newborn or 3-6 months, and even after changing hook size and tightening up my gauge, they STILL were too big. They fit ZACH and he's 14 months old. So, it was back to the drawing board.

I spent several hours searching the internet for a new pattern. (In retrospect, it was probably a little obsessive considering I already HAD a pattern for them.) But, I just so desperately wanted to make these for a newborn...obviously, eventually, I found a great EASY pattern to use.  I'm sharing the pattern below. (By the way, you are supposed to make a little circle and attach at the sides with a star to truly resemble little Chuck's but I was a little anxious to share them that I didn't do it.)

EASY CROCHET PATTERN FOR NEWBORN HIGH TOP SNEAKERS
(Substitute the gray for pink or red for cute ones for a baby girl)

Size F crochet hook
(I used a E crochet hook for newborn sole size of 3"-it all depends on your gauge)
Worsted-weight yarn small amount of each:  Gray, White, and Black.
(I used Caron Simply Soft)
Tapestry needle

Directions are given for small size with changes for large size in ( ).

Sole
Rnd 1:  With white, ch 12 (14), sc in 2nd ch from hook, sc in 7 (9), hdc in next, 2 hdc in next, 5 hdc in last.  Working down opposite side, 2 hdc in next, hdc in next, sc in 7 (9), 2 sc in next.
Rnd 2:  2 sc in 1st sc of last round, sc in next 10 (12), (2sc in next, sc in next) 3 times, sc in next 9 (11), 2 sc in next, sc in next.
Rnd 3:  2 sc in next, sc in next 11 (13), (2 sc in next, sc in next) 2 times, (sc in next, 2 sc in next) 2 times, sc in next 11 (13), 2 sc in next, sc in next, sl st in next.
Rnd 4:  This row froms a ridge for sole.  Working in back loops only, ch 1, sc around, sl st.  Finish off.

Sides of Sole
Rnd 5:  With ridge facing you, with black join with sc in 1st st after last sl st, sc in each st around, sl st in 1st sc. 39 (43) sts. Fasten off.
Rnd 6:  With white, join with sc in same place as last sl st, sc in next 14 (16), skip next sc, dc in each of next 2 sc, dc next 2 sts tog, dc in each of next 2 sc, skip next sc, (make sure here that this is centered at toe) sc in next 16 (18), sl st in 1st sc.  Fasten off.

Tongue
Rnd 1:  With gray and working in back loops only, sc in 7 sts centered at toe, ch 1, turn.
Rnd 2-4:  Sc in each sc, ch 1, turn.
Rnd 5:  Sk 1st sc, sc in next 6, ch 1, turn.
Rnd 6:  Skip 1st sc, sc in next 5, ch 1, turn.
Rnd 7-8:  Sc in each sc, ch 1, turn.
Rnd 9:  Skip 1st sc, sc in 4, ch 1, turn.
Rnd 10-13:  Sc in each sc, ch 1, turn.  Fasten off

Sides of shoe
Row 1:  With gray and working in back loops only, join with sc in 1st stitch after row 1 of tounge.  Sc in each sc across to corresponding stitch on other side, ch 1, turn.
Row 2:  Sc in each sc around, ch 1, turn.  29 (33) sc's.
Row 3:  Skip 1st sc, sc in next 26 (30), sc last 2 sc tog, chain 1, turn.
Row 4:  Skip 1st sc, sc next 2 tog, sc in 21 (25), (sc next 2 tog) 2 times, ch 1, turn.
Row 5:  Skip 1st sc, sc in 20 (24), sc last 2 sc tog, ch 1, turn.
Row 6:  Skip 1st sc, sc in 19 (23), sc last 2 sc tog, ch 1, turn.
Row 7-10:  sc in each sc, ch 1, turn.
(if you want a contrast trim in white, fasten off here and attach trim color. If not, continue on with Trim.)
Trim
Row 11: sc in each sc. Fasten off.


Circles
Make 2 for each side of shoe.  With white ch 2, 6 sc in 2nd chain from hook, sl st in 1st sc, Fasten off leaving tail for tacking on each side of shoe.

Ties
With white ch 110, fasten off.  Lace strings and tie in bow.

Have fun Crocheting these cuties!! Next crochet pattern I'm sharing is the fun little skater beanie I'm making to match...

Friday, October 14, 2011

Pumpkin Pound Cake-Breakfast or Dessert?


 Well, Happy Fall Y'all!! I'd like to introduce to you my friend Pumpkin Pound Cake with Cinnamon Glaze!

Last week, my husband told me that he was having a Bake Sale at work.(They have these once a month to raise funds for employee events.) I try to make something for him every time.  Now that Fall is here, I decided to make something to match the season. That and I was dying to find an excuse to make these!!

First, let me tell you. When I found this recipe, it was listed as a dessert? And the recipe calls for a regular sized bundt cake pan. I used my minis. One: because they are so cute and two: it made more sense for the Bake Sale to have them individually packaged? But after sampling one (or two-it was research), I'm thinking it also makes a delicious breakfast treat. Warm it up in the morning for 20 seconds in the microwave and have with your favorite cup of coffee...pure deliciousness. Now, I wouldn't recommend this as a daily breakfast item, but for a nice little treat now and then? If you can buy that cinnamon roll or muffin at Starbucks to accompany your beverage, why not, once in awhile enjoy this "dessert" for breakfast.

Here's the recipe: 

Pumpkin Pound Cake With Cinnamon Glaze

Ingredients

    Cake

    • 3 cups all-purpose flour
    • 1 tablespoon ground ginger
    • 2 teaspoons ground cinnamon
    • 1 teaspoon baking powder
    • 1/2 teaspoon salt
    • 1/4 teaspoon ground nutmeg
    • 1 1/2 cups unsalted butter, softened
    • 2 cups sugar
    • 6 eggs
    • 1 (15 ounce) cans pumpkin puree
    • 1 teaspoon vanilla extract

    Glaze

    • 2 tablespoons unsalted butter, softened
    • 1 (3 ounce) packages cream cheese, softened
    • 1 teaspoon vanilla extract
    • 3/4 teaspoon ground cinnamon
    • 1 1/4 cups powdered sugar, sifted
    • 2 -3 tablespoons heavy whipping cream
    • 1/3 cup coarsely chopped walnuts

Directions

  1. For Cake: Heat oven to 325 degrees farenheit. Grease 12-cup Bundt pan with shortening. Sprinkle with flour; tap pan to remove excess flour.
  2. In medium bowl, whisk together flour, ginger, cinnamon, baking powder, salt and nutmeg.
  3. In large bowl, beat 1 1/2 c butter and sugar at medium speed 2 minutes or until light and fluffy. Add eggs two at a time, beating well after each addition. At low speed, beat in pumpkin and 1 tsp vanilla until well-blended. Slowly add flour mixture, beating just until incorporated. Spoon batter into pan.
  4. Bake 1 hr and 20 minutes to 1 hr and 30 mminutes or until deep golden brown and wooden skewer inserted in center comes out clean. Cool on wire rack for 15 minutes. Invert cake onto wire rack; cool completely.
  5. For glaze: In large bowl, beat butter, cream cheese, vanilla, and cinnamon at low speed for 1 minute. Slowly beat in powdered sugar until smooth. Beat in cream until mixture reaches desired consistency. Pour glaze over cake; arrange nuts in a ring around the top rim of the cake. Let stand until glaze is set.
I got the recipe from here. The only thing I changed is the glaze.  After making the glaze, I put it in a microwavable POURABLE container like this. I microwaved it for 30 seconds, stirred it up a little and then poured it over the mini bundt cakes. It was so much easier than trying to drizzle it with a spoon. And I prefer the glaze to be a little thin. Plus, I didn't use nuts. Not because I don't like them, but because I didn't have any on hand. :(

I used these for the pans but I saw these at Michael's the other day. I'm thinking I might have to grab one!  They seem so much easier than trying to place and remove 8 individual pans in the oven?


There it is...I can't wait for you to try. I'm curious. Do you think that they a dessert or breakfast treat?  Hmmm...

Wednesday, October 12, 2011

From Super Easy to SUPER DUPER EASY!!!

Ok, so I grabbed another ball of the new Sashay yarn (this time in orangey red) and decided to try it using my Knifty Knitter. Omigosh!! Why didn’t I think of this sooner?!! It only took me 2 hours (instead of 4)to make a new scarf! Check out this post for details on the scarf.
Anyway, I was dying to share this with you all so that you, too, can have something fun for your scarf wardrobe. 
Here‘s what you’ll need instead of knitting needles:


Pull out a length of the yarn and stretch it open. Place the edge with the metallic thread toward the inside of the ring.  Take the end of the yard and loop onto the peg on the outside of the ring.
Take the end and attach to the little peg and then “loop” the yarn to the left onto 4 or 6 or 10 (depending on your length and width of choice-remember 4 or 6 will get you a longer scarf. 10 will be shorter. )
Here's a view from the top of the weave so you can see which openings I used to loop onto pegs:
Here's a view from the top:
Before you start the next "layer," make sure to push down the loops that are currently on the pegs. Flip the yarn back over to the right and “loop” the weave on top of the other loops.

Here's a view from the inside:


On each peg, there are now 2 loops. Using the Knifty Knitter tool, loop the bottom loop up over the top loop.


Continue to loop all the bottom ones up and over the top from left to right until there is once again only one loop on each peg.
 Then, you will repeat the process again for each row. From right to left, you will add new loops to each peg until each peg has two loops on it. (Make sure that you are placing the same part of the weave onto the loops.)
You continue with this process until you have about 6-8 inches left of the yarn. Also,  make sure that the end of the yarn is to the right.
To complete the project or "bind off," you will need to start to the left or the peg furthest from the end of the yard. Using a crochet hook or the tool (Crochet hook is easier-I was lazy to search for one so I used the tool) slowly remove the loop on the left peg.
Hook the loop onto the next peg to the right above the loop already there.
There should be only 3 pegs with yarn on them now. You will continue to transfer the loops onto the next peg to the right in this same way until you get to the last one.
When you get to the last loop, remove the loop from peg. This is where it gets tricky with the tool and it make much more sense to use the crochet hook. But alas, my laziness won and I made do with the tool. I recommend you NOT be lazy. It will save you some heartache.

With the tool/hook, pull the end of the yarn through the last loop.


Pull end loop tight, trim, and then fluff the ends. And you are done!!

Isn't this way sooo much easier and quicker? When I decided to make another scarf using the Knifty Knitter, I felt like I was cheating. But knowing how much easier this is and how much less time it took, I kind of don't care. Because now I have 2 scarfs to enjoy!!

Good luck and happy Knifter Knitter-ing(?)!


A Super Easy Scarf

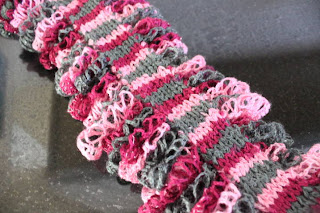
So, this past weekend I decided to pop into Michael’s to browse for Halloween stuff. Somehow I ended up in the Yarn aisle. Have you been recently?!! WOWZERS!! There are soooooo many new ones to choose from! I was instantly drawn to this yarn, so I HAD to buy it.
(Of course, I didn’t buy any Halloween décor. I couldn’t wait to start a new project with what I found!!)
Anyway, after 4 hours total (2 hours here and 2 hours there), this is what I ended up with:

It’s Super Easy!! The yarn even comes with instructions. Up close it looks like this:

If you spread it open, it looks like this:

So, here are the instructions that come with it:
Knitting Needles 5.5 mm/Gauge is not important.
For a longer scarf cast on 6 stitches. For a shorter, wider scarf cast on 10 stitches. (parenthesis show the wider/shorter size). Stretch one end of the Sashay open for several inches and lay it flat, placing the edge with the metallic thread along the bottom. Notice that the Sashay yarn is a mesh of holes. You will be working with the top of the mesh and leaving the metallic edge loose to form a ruffle.
Beginning at the top right edge, insert tip of a knitting needle from back to front starting 4” from end. Continue inserting needle 5 (9) more times. You know have 6 (10) cast on stitches.
Pick up the needle with the 6 (10) stitches and knit using the top 2 threads of the mesh rather than the entire strand. Continue knitting in stockinette stitch these 6 (10) stitches on each row, always turning your work in the same direction at the end of rows. Put your work down and open up the mesh as you go. Stop knitting when you have 1 yard left for binding off.
FINISHING:  Bind off loosely, drawing the end of the Sashay through the last bound stitch. Trim leaving 4” end. To finish ends, fold under the corn and task to inside with sewing needle and thread.  ( I didn’t do this-I just trimmed it and it looks fine to me.)
Click here for a video.
Here’s what the actual KNIT part looks like in the back:

Here’s the front:

I decided to go with Casting on 6 because I wanted my scarf to be skinnier and longer. I was overall happy with the result, but I think for my next one, I will go even skinnier by casting on 4 instead.
But what a great addition to my Fall and Winter wardrobe. Because of its length, you can wear in so many ways. Like this:

Or this:

Or this:

Or this:

How fun for one ball of yarn and a few hours!! Now if only San Diego would realize that it's Fall so I can wear it!

Friday, October 7, 2011

Salted Caramel Cupcakes-yummm...

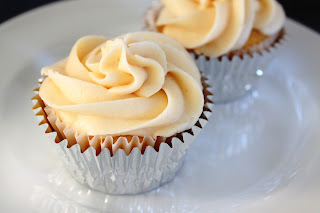
I had trouble deciding what my birthday treat was going to be. I wanted to make something that I love. I usually make chocolate cupcakes or chocolate cake because MOST everyone loves Chocolate. But when I saw this post, I KNEW that I NEEDED them to make my birthday complete. They are yummy deliciousness!!

After making the cupcakes from the site's recipe, I felt they came out too dense for me, so I switched up my recipe (for the cupcake part) slightly from the site and made a new batch. I was sooo happy with the change.  Here's the recipe with a few of my tweaks:

Salted Caramel Cupcakes Cupcakes   

Makes 36 cupcakes

  • 3 cups cake flour, (not self-rising), sifted
  • 1 1/2 cups all-purpose flour
  • 2 1/4 teaspoons baking powder
  • 1 1/2 teaspoons coarse salt
  • 3/4 teaspoon baking soda
  • 9 ounces (2 sticks plus 2 tablespoons) unsalted butter, softened
  • 2 1/4 cups sugar
  • 5 large eggs plus 3 large yolks, room temperature
  • 2 cups buttermilk, room temperature
  • 2 teaspoons pure vanilla extract
Preheat oven to 350 degrees. Line standard muffin tins with paper liners. Whisk dry ingredients in a large bowl. Cream butter and sugar with a mixer until light and fluffy. Add eggs, 1 at a time, beating after each addition.  Reduce speed to low. Mix remaining wet ingredients in a bowl. Add dry ingredients to butter mixture in 3 additions, alternating with wet ingredients and ending with dry. Scrape sides of bowl. Divide batter among muffin cups, filling each full. Bake cupcakes until testers inserted into centers come out clean, about 20 minutes. Let cool in tins on wire racks.

Salted Caramel Filling:
  • 1 cup sugar
  • 6 tablespoons salted butter cubed
  • 1/2 cup plus 2 tablespoons heavy cream, at room temperature

Melt the sugar over medium  high heat in a large pot.  Whisk the sugar as it melts and cook until it becomes a deep amber color. Add the butter and stir it in until melted. Pour in the heavy cream (mixture will foam) and whisk until you get a smooth sauce. You may have some lumps but keep stirring until they have melted.  Remove from heat and let cool slightly.  
 
Cut a small round piece out of the tops of each cooled cupcake and pour in 1 teaspoon of caramel.  Replace the cake piece and set cupcakes aside.
Salted Caramel Buttercream Frosting:

  • 1/2 cup granulated sugar
  • 4 tablespoons water
  • 1/2 cup heavy cream
  • 2 teaspoons vanilla extract
  • 2 sticks salted butter
  • 2 sticks unsalted butter
  • 1 teaspoon sea salt
  • 3 cups powdered sugar


In a saucepan, stir together granulated sugar and water.  Bring to a boil over medium high heat.  Cook without stirring until mixture turns a deep amber color.  Remove from heat and slowly add in cream and vanilla, stirring until very smooth.  Let caramel cool for about 20 minutes, until it is just barely warm and still pourable.

In a mixer fitted with paddle attachment, beat butter and salt together until lightened and fluffy.  Reduce speed to low and add powdered sugar.  Mix until thoroughly combined.

Scrape down the side of the bowl and add the caramel.  Beat on medium high speed until light and airy, and completely mixed (about 2 minutes).  Mixture should be ready to use without refrigeration.  If your caramel was too hot when added, it will cause your icing to be runny.  If this happens refrigerate for 15-20 minutes. 

Top caramel-filled cupcakes with frosting and enjoy!!


Tuesday, October 4, 2011

A New "Scary" Age

I turned 38 years old last week. I don’t feel 38. 38 was my scary age.  When I was younger I thought that when you hit 38 years of age, you were OLD. I don’t feel old. (Well, some days I feel older than others…)AND I don't think I'm scary.  Not yet. So, I've upgraded my scary age to 48. (MY scary age. Not saying that everyone is scary at 48. I know some pretty awesome 48 year olds.)
Anyway, where does that leave newly turned 38 year old me? I don’t know yet.
But I do know what I hope for?
1.       I hope to thank God for every gift he gives me every day of my life, especially in this 38th year of my life.
2.       I hope to remember to savor every moment-good and bad.
3.       I hope to do everything I can to let my kids know that I love them with all my heart.
4.       I hope that my husband will know how grateful I am that he’s my partner every moment we’re together.
5.       I hope to grow thicker skin.
6.       I hope to “let it go” more.
7.       I hope to lose the weight that I keep saying that I need to lose and don’t because I like good food too much.
8.       I hope to conquer the Bermuda grass we inherited when we bought our home.
9.       I hope to be able to say “no” without the usual guilt complex that comes after my answer.
10.   I hope to spend more time reading, sewing, baking, and creating.
I got to celebrate my birthday 3 times this week. How blessed am I that I’m surrounded by family and friends who want to share this occasion with me?! Happy 38th Birthday to me! I can’t wait to see what this year brings…